
All the credit for these goes to my friend Ron. He’s famous throughout California’s central valley for his blue cheese burgers! I don’t have his recipe because even though I think I managed to pry it from him once, I never wrote it down. But I was craving a blue cheese burger today for lunch and since Ron and Ruby live in California and I’m still in Sicily, I had to come up with something myself!
Most of the blue cheese burgers I’ve eaten in my life are just a regular burger with the addition of some type of blue cheese dressing as a condiment. Whoever came up with that idea is a genius because blue cheese plus hamburger equals YUM!
Even better is that same burger with some bacon on it. I’ve eaten many bacon and blue cheese burgers in my life thanks to McMenamins East 19th Street Cafe in Eugene, Oregon. I don’t know what I miss more, that Captain Neon Burger or those pitchers of Terminator Stout. Ah, the good old days…
So, as I was saying, most blue cheese burgers come with the blue cheese on top. But then Ron came along with his blue cheese-stuffed burgers and my whole world was turned upside down. What’s so great about blue cheese being inside the burger? I really don’t know. Perhaps it’s just the novelty, but there’s something really special about a seemingly normal looking burger that starts oozing creamy blue cheese when you bite into it!
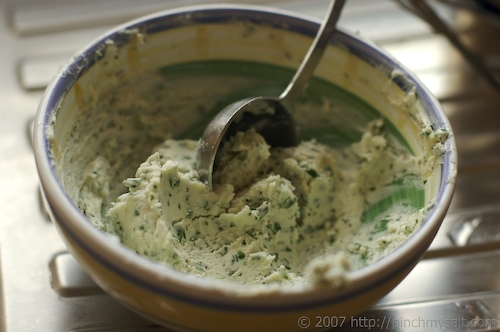
The only thing I remember about Ron’s burgers is that the filling is a mixture of blue cheese and cream cheese. So, that’s what I did. I kept it simple and just mixed equal parts cream cheese and crumbled blue cheese, added a bit of onion powder, some chopped fresh parsley and salt and pepper to taste. I didn’t bother to let the cream cheese soften, I just mashed it all up together in a small bowl with a fork.
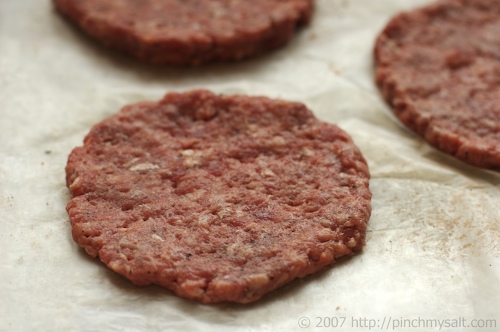
I decided to stick with quarter pound burgers because the hamburger buns I bought are pretty small (just the standard small Wonder brand buns). So I first divided one pound of ground beef into four equal parts. Then I divided each part in half so that I ended up with eight equal portions of ground beef (each should weigh about 2 oz.). I formed those into balls and sprinkled them all with salt and pepper, rolling them around a bit so all sides were seasoned. Next, working on waxed paper, I flattened each of those little balls into very thin patties.
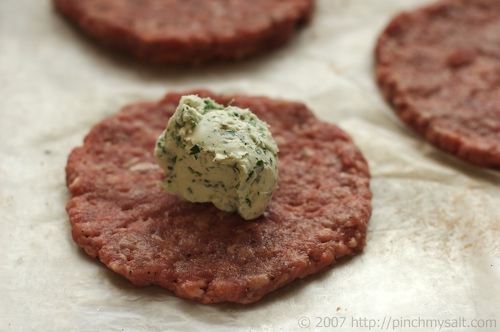
To fill a burger, I put a spoonful of the cream cheese filling (about a tablespoon works well) in the center of one patty.
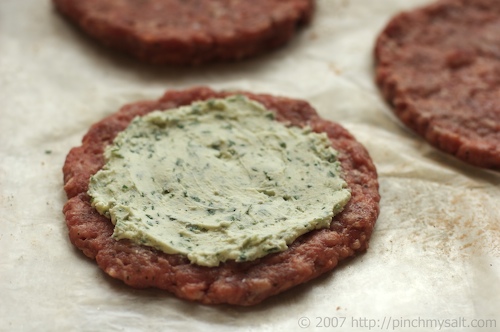
Then I spread the filling equally over the patty, leaving some room around the edges for a seal.
Then I put another patty on top of the filling.
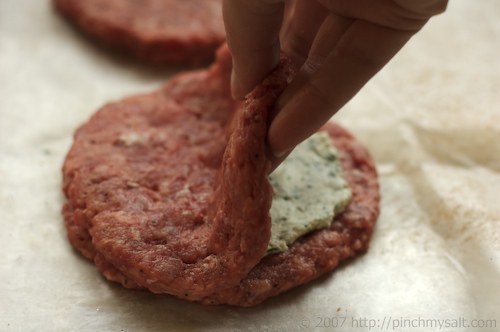
Next, I pressed the edges together to form a seal. You don’t need to pinch the two patties together, just gently work the edges together so that they will stay sealed.
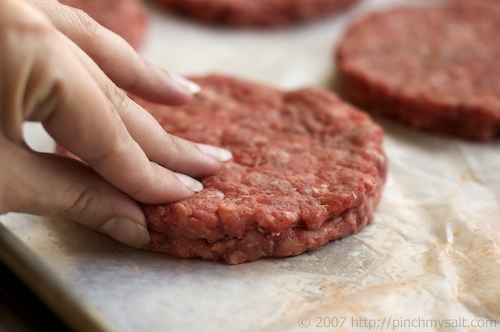
After I finished all four burgers, I liberally sprinkled both sides of them with coarsely ground black pepper.
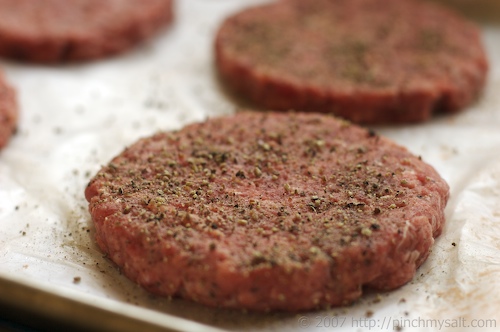
Then I put them on the grill! Grilling time is a matter of preference. I like my burgers well done but since I made the patties pretty thin, they ended up cooking quickly.
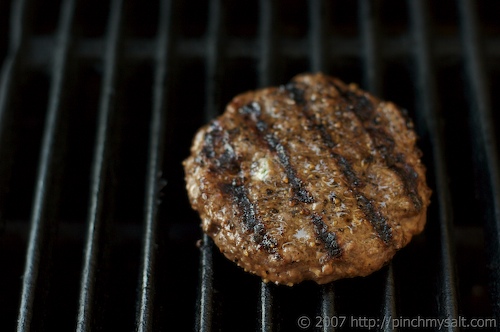
I’m sure I don’t have to tell you about shrinkage but I thought I would take this photo to remind you! When making your hamburger patties, always make them larger than you think they need to be!
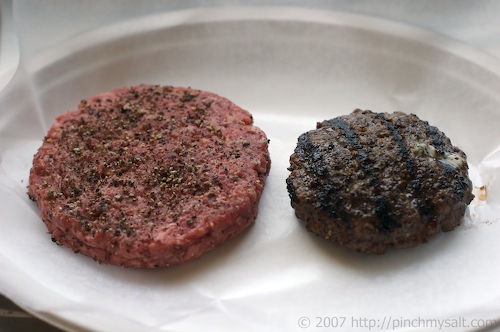
See, it ended up fitting the bun perfectly! Since these burgers are so flavorful, I keep the condiments to a minimum. But if I would have had some lettuce, tomato and bacon in the house, they would have been on here too!

It might look plain…
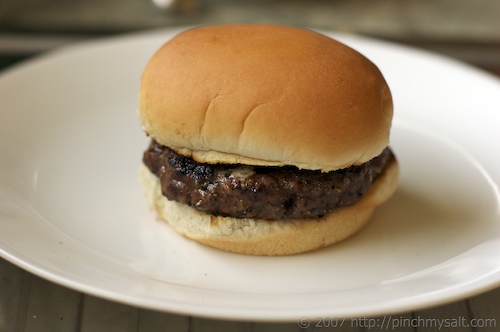
but look what’s waiting inside!
Now here’s my warning. First of all, let them rest for a little while before you eat them. The cheese in the middle is hot and oozy and I don’t want to get blamed for someone burning themselves! I also think it’s best to cut these in half before eating them. I found out the hard way that the contents inside are under pressure! I took my first bite and the burger had a blowout in the back. I’m serious, it was like a mini explosion! There’s no way around it, these are messy burgers. But that’s what makes them fun, right?
Blue Cheese Burgers
2 oz. cream cheese
2 oz. crumbled blue cheese
1/8 t. onion powder
1 T. chopped fresh parsley
salt and pepper to taste
1 pound ground beef (I use 85% lean)
salt and pepper
Coarsely ground black pepper (optional)
1. In a small bowl, mash together cream cheese and blue cheese then stir in the onion powder and parsley. Taste and season with salt and pepper.
2. Divide ground beef into 8 equal pieces. I first divide it into four pieces then divide each piece again. Form the pieces into balls then sprinkle the balls lightly with salt and pepper, rolling them around a bit to make sure all sides are covered. Flatten each ball to form thin patties of equal size. I find it easiest to form the patties on a sheet of waxed paper.
3. To fill burgers, place a tablespoonful of cream cheese mixture in the center of each of four patties. Spread the filling out evenly to within half an inch of the edge of each patty. Place the remaining patties on top to form four filled burgers. Gently press the edges of each burger together to form a seal.
4. Sprinkle burgers liberally with coarsely ground black pepper (optional).
5. Prepare your grill and cook burgers until the internal temperature reaches 160 degrees (USDA recommendation) or until desired degree of doneness. Let rest for ten minutes.
6. Enjoy!
Recipe Notes: I recommend cutting these burgers in half before eating to avoid ‘burger blowout.’ I don’t add anything besides salt and pepper to the meat because the filling is so flavorful, but you are more than welcome to add extra seasoning to the meat if that’s what you like. Feel free to experiment with different seasonings in the filling, too!
Related Recipes:
- Creamy Blue Cheese Dip with Lemon and Chives
- Bacon Tomato and Blue Cheese Focaccia Sandwich
- Bacon Wrapped Beef Medallions with Smoked Paprika Butter
- Homemade Sloppy Joes
Around the Web:
- Sassy Blue Cheese Burgers from Vanilla Garlic
- Blue Cheese-Stuffed Burgers from Food, and Other Musings
- Stuffed Lamb Burgers from Seriously Good
- Port Salut Stuffed Turkey Burgers from Je Mange la Ville
Some Burger Making Pointers:
- How to Make a Great Hamburger from Baking Bites
- The Burger from Beyond Salmon
Doctor Who Matt Smith says
Branch says
Cory says
Jeanna says
Mary Jane says
Teresa says
Hannah says