I have been looking forward to this Pane Siciliano for months, but for some reason just couldn’t get it started. Perhaps it was the knowledge that this particular bread takes three days to complete. Even though I knew that most of the allotted time would be dedicated to waiting for the dough to ferment and didn’t require any extra effort, I was still intimidated. It’s hard for me to plan things one day in advance, much less three days in advance! But I finally did it. And yes, this golden-hued bread was worth the wait. It was as delicious as it was beautiful.
Like the Pain de Campagne before it, this bread starts with a pâte fermentée, a small batch of dough that is made the day before the main batch of dough gets put together. So on the first day, you just need to make a quick batch of pâte fermentée and put it in the refrigerator to ferment overnight. I used the stand mixer for that part.

The second day, take the pâte fermentée out of the fridge and cut it into small pieces. Cover it with a towel and let it sit at room temperature for an hour or so.

Meanwhile, get ready to mix up the dough. Put the dry ingredients (flour, semolina, instant yeast and salt) into a large mixing bowl or the bowl of a stand mixer. I decided to mix this one by hand.

Next, add the rest of the ingredients: water, olive oil, honey, and the pieces of pâte fermentée.

Mix vigorously with a wooden spoon or with the paddle attachment on your stand mixer until you have a shaggy, slightly sticky ball of dough. As usual, if the dough is too sticky, add a bit more flour. If it’s too dry, or if there is still flour left in the bowl after mixing, add a bit more water.

If you are using a stand mixer, switch to the dough hook for kneading. If not, dump the dough out onto a floured work surface to knead by hand.

Knead the dough by hand for about ten minutes (6-7 minutes in a stand mixer) until smooth and supple.

At this point it should pass the windowpane test. Mine didn’t. I kneaded it for another minute or so then just moved on.

Now it’s time to let the ball of dough rise until doubled in size. The book says to let it ferment at room temperature for about two hours. My apartment was pretty warm, so I had a feeling it might double faster than that.

I was right. It only took about an hour and a half to double in size.

Dump the dough out onto the counter and grab a knife or bench scraper to help divide the dough into three pieces.

Divide the dough as equally as possible, then use a scale to check the weight. I cut off and added little pieces of dough until they were all close to the same weight. (You do own a kitchen scale by now, don’t you?)

Preshape each piece into a bâtard (they don’t have to be perfect), then cover with a towel and let them rest for a few minutes to relax the gluten.

Using the palms of your hands, roll each bâtard into a long skinny baguette, about 24 inches long. If the dough resists and shrinks back up, let it relax for a few more minutes and try again.

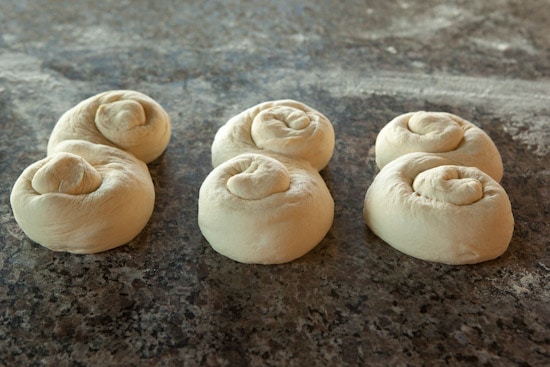
To shape the Pane Siciliano, roll each end of a baguette toward the center – each side in the opposite direction so that it resembles a tightly coiled “S” shape.

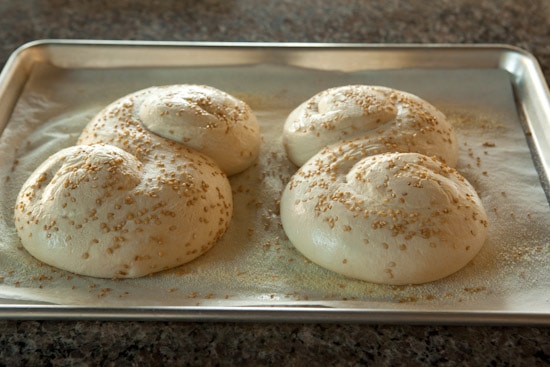
Line two sheet pans with parchment and sprinkle semolina over the parchment paper. Transfer two loaves to one pan and the remaining loaf to the second pan.

Mist all of the loaves with water and sprinkle the tops with sesame seeds. I only had toasted sesame seeds, but would have preferred white ones and suggest that’s what you use (the toasted ones don’t show up well against the brown crust). Mist the tops of the loaves with spray oil and cover both pans loosely with plastic wrap. Put pans in the refrigerator to ferment overnight.

When you are ready to bake the loaves, remove the pans from the refrigerator and let sit at room temperature for about an hour. Meanwhile, prepare the oven for hearth baking and preheat it to 500 degrees.

Bake the loaves using steam for about 30 minutes (I baked one pan at a time) or until golden brown.

I thought the loaves were beautiful and loved the way they looked on the bottom as well as the top.

The crumb was soft and golden with small, irregular holes. It did remind me of some of the breads we ate while living in Sicily. I especially liked the crust which was thin and crunchy and chewy for the first few hours. The bread was good the next day, but I think the texture of the crumb and crust were best on day one.
If you’re following along in the challenge, the actual formula can be found on page 198 of The Bread Baker’s Apprentice. The next bread I’ll be baking is Panettone, the traditional Italian Christmas bread. It’s a bit early for a holiday bread, but maybe if I start practicing now, I can perfect it by December!
Want to Join The Bread Baker’s Apprentice Challenge?
There are several ways for you to join in the fun! First of all, you need a copy of Peter Reinhart’s The Bread Baker’s Apprentice. Read the first section of the book carefully, as this will prepare you for the bread recipes in the second section of the book. Then just jump in and bake some Anadama Bread, which is the first bread formula in the book. You may also visit The BBA Challenge Page for more details on how to participate in the group.
If you haven’t already, you might want to bookmark the BBA Challenge Page. From there you can see which breads are coming up soon, find answers to Frequently Asked Questions, visit and/or add yourself to our World Map, see the BBA Challenge Blogroll, and check out the continually updated slideshow of BBA Bread photos from our ever-expanding group of bakers!
Pane Siciliano from other BBA Bakers:
- Bread Experience
- A Tiger in the Kitchen
- Two Skinny Jenkins
- Ährelich Gesagt
- Round the Table
- The Yumarama Bread Blog
- Joelen’s Culinary Adventures
- Something Shiny
- I Can Do That
- The Other Side of 50
- Texas Farmer’s Hot Stove
- Bewitching Kitchen
- Salt and Serenity
- Gourmet Hotdish & Other Culinary Disasters
- Grandma’s Kitchen Table
pam says
amanda @ fake ginger says
HPD says
Susie says
Nick (Macheesmo) says
The Teacher Cooks says
Prerna@IndianSimmer says
Samantha Angela @ Bikini Birthday says
christine says
heather says
Jodi says
Veronika Rojas says
Kristie says
Abby says
Leli Wiggins says
Renee says
WeightLoss Willie says
ATigerInTheKitchen says
Linda Gleason says
Raven Whitman says