• Skip to main content
  • Skip to primary sidebar

Pinch My Salt

Food, Recipes, and Photography

  • About
  • Contact
  • Links
  • Recipe List
  • Store
  • The BBA Challenge

Red Velvet Cake Recipe with Cream Cheese Frosting

November 10, 2008 by Nicole 501 Comments

Red Velvet Cake | pinchmysalt.com

Red Velvet Cake. Until I met my husband, I had never even heard of a red velvet cake. Since it seems to be a southern specialty, I guess it’s not surprising that I never ran across one growing up in California.

But thanks to the California cupcake boom, it seems like there’s now a cupcake shop on every corner and every single one of them features some version of miniature red velvet cake.

But that’s not why I made this cake. My husband’s family LOVES Red Velvet Cake. His sister Katie gets it every year for her birthday, but they all love it. From hearing Justin, Katie, and Daniel talk about it, I began to think that this mysterious red cake had magical powers. But somehow, after seven years of marriage, I have yet to taste my mother-in-law’s version.

And partly because I was tired of waiting, but mostly in celebration of a momentous occasion, I decided to take matters into my own hands, and give this cake a try myself. Luckily, I had the family recipe!

You see, right before we left Sicily last year, my husband was promoted. In the military, promotions are always a big deal, but this one happened to be a VERY big deal. I could have baked a carrot cake, which is definitely one of his favorites.

I even toyed with the idea of a Black Forest Cake, another one that gets requested from time to time (maybe next time, Justin). But there was something about this Red Velvet Cake recipe that fascinated me. And since I had THE family recipe in my book, I decided it would be a fun surprise!

Now, I won’t lie. After reading the recipe, I was a little hesitant about making a cake that uses two full ounces of red food coloring. I even got online to check other red velvet cake recipes to make sure that I had copied the recipe down right!

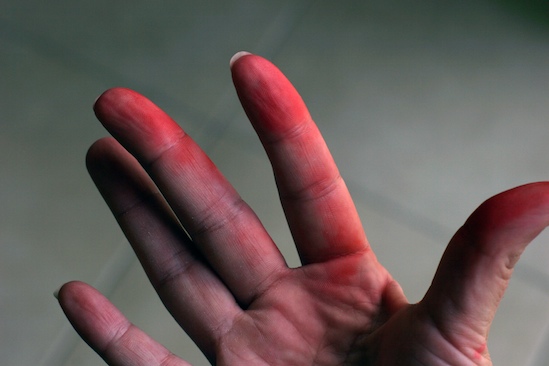
Sure enough, lots of Red Velvet Cake recipes require the same amount of food coloring. And, I wanted to stay true to the recipe that his family loves, so I gave it a try. And in the process, lot of things in my kitchen turned red!

Kitchen Aid Mixer with Red Velvet Cake Batter Smudge | pinchmysalt.com

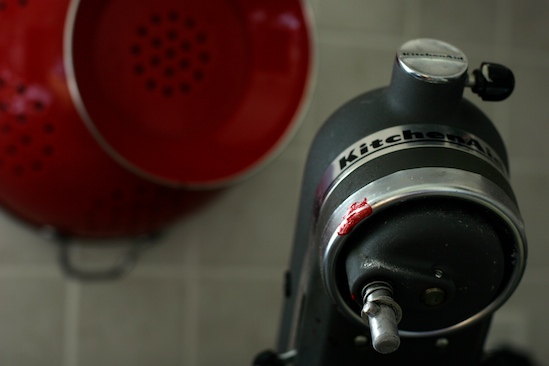
Especially my hands. Please make sure you don’t wear white clothing while making this cake!

Fingers stained red from red velvet cake | pinchmysalt.com

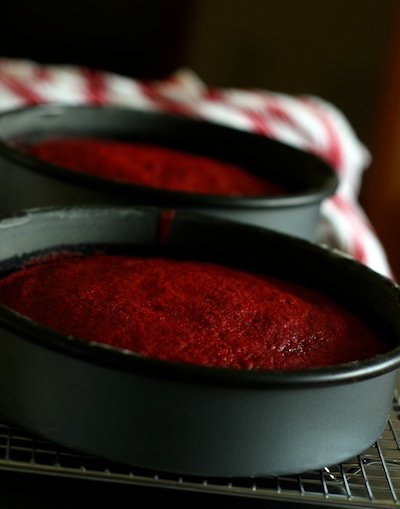
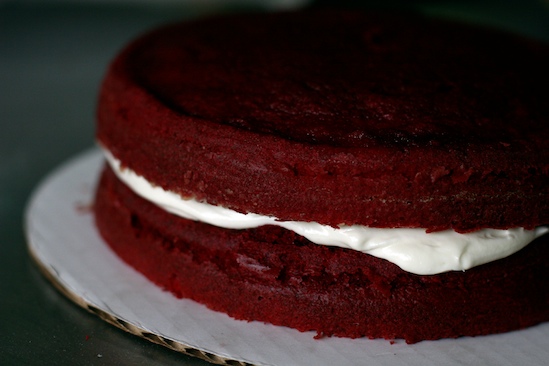
But, using all that food coloring really does make a beautiful, beautiful cake. Just look at these layers as they came out of the oven! As soon as I saw them, I was glad that I gave this cake a try.

Red Velvet Cake Cooling in Pans | pinchmysalt.com

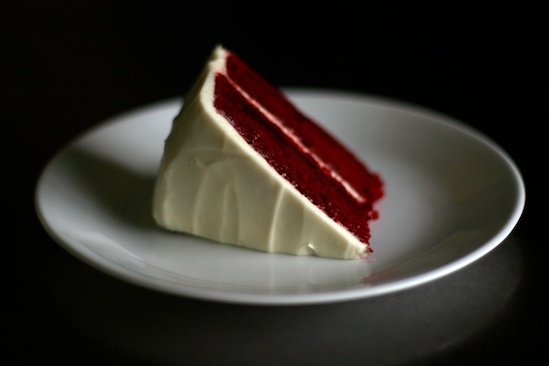
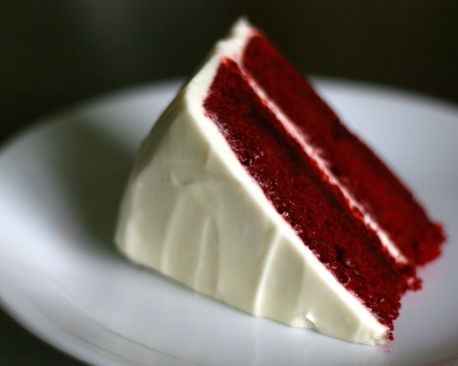
And although it might not be the traditional frosting, my husband loves cream cheese frosting (and so do I), so that’s what I used on this cake.

I baked two 9-inch layers, rather than three, since I don’t have the 8-inch cake pans. It was beautiful as it was, but I can only imagine that the three red layers would be even more beautiful and dramatic.

Red Velvet Cake Waiting for Frosting | pinchmysalt.com

Since it’s difficult to keep the red crumbs from showing on the white frosting, I attacked this frosting job with a specific plan in mind.

I first put a thin layer of frosting all over the cake, to trap the unruly red crumbs. I might have even stuck it in the fridge for a bit to set that first layer of frosting, but I honestly can’t remember now.

Frosting a Red Velvet Cake | pinchmysalt.com
Red Velvet Cake Crumb Coat | pinchmysalt.com

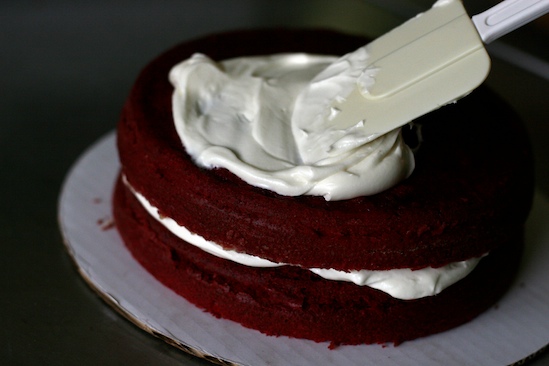
Next, I added a second layer of frosting to cover up any hint of what lay beneath.

Red Velvet Cake with Cream Cheese Frosting | pinchmysalt.com

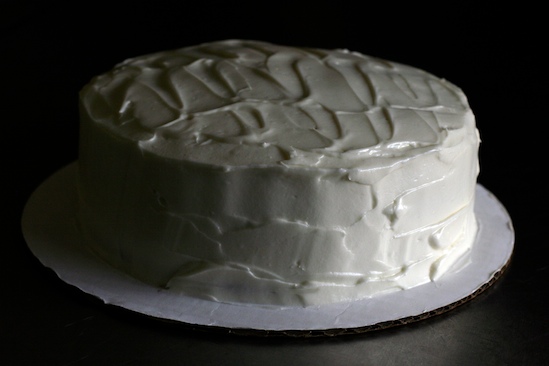
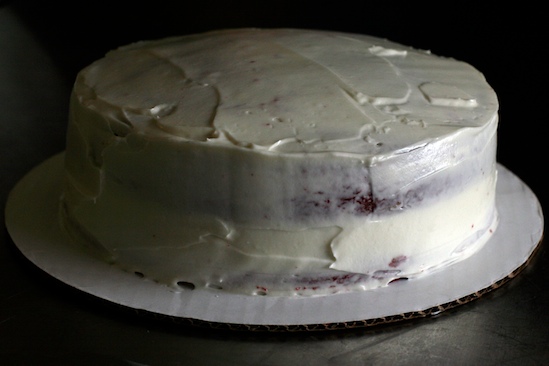
Part of what was so amazing about this cake is that once it’s frosted, no one has any idea of the bright red surprise waiting inside.

Red Velvet Cake Slice | pinchmysalt.com

Although I did stay true to the amount of food coloring in the original family recipe, I did make a few small changes. For one thing, the original recipe calls for shortening, and I decided to use unsalted butter instead.

It’s not that I never use shortening anymore, it’s just that I generally prefer butter. And also, that’s what I had on hand the day I made the cake. If you prefer shortening in cakes, go for it. I also added an extra tablespoon of cocoa powder, the original recipe called for only one tablespoon. I think everything else is pretty true to the original.

I thought this really was a great cake. For one thing, it’s absolutely beautiful. But it also has a great flavor—although the flavor is really kind of hard to describe. Just trust me, it’s good.

It was also very moist, which is my favorite kind of cake. And although the original recipe says you can frost it with either butter cream or cream cheese frosting, I really do recommend the cream cheese!

Update 2/4/09: I also turned this cake recipe into delicious Red Velvet Cupcakes, just in time for Valentine’s Day!

Red Velvet Cake on kitchen counter | pinchmysalt.com

Related Recipes:

  • Red Velvet Cupcakes with Cream Cheese Frosting
  • Easy Lemon Cake
  • Chocolate Stout Cupcakes with Vanilla Bean Cream Cheese Frosting
  • Apple Galette
  • Pumpkin Roll

Around the Web:

  • Red Velvet Cake from Smitten Kitchen
  • Red Velvet Cupcakes from Firefly Pie
  • Red Velvet Cupcakes with Sprinkles Cream Cheese Frosting from Alice Q. Foodie
  • Red Velvet Cupcakes from Off the (meat)hook
  • Red Velvet Black and White Cookies from Joy the Baker
Red Velvet Cake Recipe with Cream Cheese Frosting

Red Velvet Cake Recipe with Cream Cheese Frosting

Yield: 16 slices
Prep Time: 1 hour
Cook Time: 30 minutes
Additional Time: 2 hours
Total Time: 3 hours 30 minutes

Ingredients

Cake:

  • 2 1/2 cups sifted cake flour*
  • 1 teaspoon baking powder
  • 1 teaspoon salt
  • 2 Tablespoons cocoa powder (unsweetened)
  • 2 oz. red food coloring
  • 1/2 cup unsalted butter, at room temperature
  • 1 1/2 cups sugar
  • 2 eggs, at room temperature
  • 1 teaspoon vanilla extract
  • 1 cup buttermilk, at room temperature
  • 1 teaspoon white vinegar
  • 1 teaspoon baking soda

Cream Cheese Frosting:

  • 16 oz. cream cheese (2 packages), softened
  • 1/2 cup unsalted butter (one stick), softened
  • 1 teaspoon vanilla extract
  • 2 1/2 cups powdered sugar, sifted
  • pinch of salt

Instructions

1. Preheat oven to 350 degrees. Butter and flour two 9-inch round cake pans or three 8-inch round cake pans.

2. Sift together the cake flour, baking powder, and salt into a medium bowl; set aside. In a small bowl, mix food coloring and cocoa powder to form a thin paste without lumps; set aside.

3. In a large bowl, using a hand mixer or stand mixer, beat butter and sugar together until light and fluffy, about three minutes. Beat in eggs, one at a time, then beat in vanilla and the red cocoa paste, scraping down the bowl with a spatula as you go. Add one third of the flour mixture to the butter mixture, beat well, then beat in half of the buttermilk. Beat in another third of flour mixture, then second half of buttermilk. End with the last third of the flour mixture, beat until well combined, making sure to scrape down the bowl with a spatula.

4. Make sure you have cake pans buttered, floured, and nearby. In a small bowl, mix vinegar and baking soda. Yes, it will fizz! Add it to the cake batter and stir well to combine. Working quickly, divide batter evenly between the cake pans and place them in a preheated 350 degree oven. Bake for 25-30 minutes. Check early, cake is done when a toothpick inserted in the center comes out clean.

5. Cool the cakes in their pans on a wire rack for 10 minutes. To remove the cakes from the pan, place a wire rack on top of the cake pan and invert, then gently lift the pan. Allow cakes to cool completely before frosting. Frost with buttercream or cream cheese icing (recipe below).

Frosting Instructions:

With an electric mixer, blend together cream cheese and butter until smooth. Turn mixer to low speed and blend in powdered sugar, salt and vanilla extract. Turn mixer on high and beat until light and fluffy. Use immediately or refrigerate, covered, until ready to use. If refrigerated, the frosting will need to be brought to room temperature before using (after frosting softens up, beat with mixer until smooth).

If you prefer a sweeter and/or stiffer frosting, more powdered sugar can be added (up to four cups). But remember, the more sugar you add, the less you'll be able to taste the tangy cream cheese!

Notes

*Sift cake flour once before measuring, then sift again with the other dry ingredients per recipe instructions. Wear an apron and be careful with the red food coloring--no matter how hard I try, I always end up staining something! As you're mixing the cake batter, use a spatula to scrape down the bowl frequently throughout the entire process.

Nutrition Information:
Yield: 16 Serving Size: 1
Amount Per Serving: Calories: 2816Total Fat: 9gSaturated Fat: 3gCholesterol: 10mgSodium: 4718mgCarbohydrates: 640gSugar: 354gProtein: 58g
Category: Desserts

Filed Under: Adventures in Baking, Christmas, Holiday, NaBloPoMo Tagged With: cake, dessert, Holiday, NaBloPoMo, recipe, red velvet

Previous Post: « Simple Side Dish: Black Beans and Corn with Green Chiles
Next Post: Girls Night Out on Twitter »

Reader Interactions

Comments

  1. Laura says

    December 24, 2012 at 6:49 pm

    Carla^ Ha! I just did the exact same thing with the butter!! Waiting to see how it turns out...hope no one notices :P
    Reply
  2. Seema says

    January 7, 2013 at 4:31 pm

    Hi...I tried ur recipe for Red Velvet Cake ... Few times with all purpose flour it turned out well...and I used 2 1/4 th cup in place of cake flour....and I used shortening in cream cheese frosting...it was delicious. Thank you...<3
    Reply
  3. http://tinyurl.com/leareddy25531 says

    January 11, 2013 at 2:47 pm

    “Red Velvet Cake Recipe - Pinch My Salt” was indeed a great blog post. If solely there were much more weblogs such as this particular one in the actual online world. At any rate, many thanks for ur precious time, Drusilla
    Reply
  4. Malynda says

    February 9, 2013 at 12:01 pm

    I made this cake and it tastes and looks wonderful, however it fell in the middle. I live in Highlands Ranch CO and the altitude is high. Do you have any suggestions? I filled the hole with frosting, but it made it a little sweet in that area.
    Reply
  5. Jen says

    March 11, 2013 at 10:58 am

    I've made this as cupcakes many times and they're always a hit! People have told me that other red velvet cake/cupcakes pale in comparison. I was wondering if a 9x13 pan would work for this or if it would need something bigger/smaller. I'm making it for a party and the single layer will go farther than a 2-layer cake when cutting it up. Thanks!
    Reply
  6. Karma says

    March 28, 2013 at 10:22 pm

    Can you tell me how many eggs you used please.
    Reply
  7. Ellie says

    March 30, 2013 at 9:13 am

    red velvet is my sisters favorite cake. I've been looking to try to find the right recipe to make for her birthday. this is it! can't wait to make it. i'll try to remember to post a comment how it turns out but i'm sure it will be great! :) thank you for sharing this.
    Reply
  8. Ashley says

    July 6, 2013 at 1:42 pm

    I made the cake recipe but I only used half the coloring. It was still really red. I used no-taste Wilton Red. It was delicious and worked well for my flag cake.
    Reply
  9. Angela says

    July 16, 2013 at 11:10 am

    the only issue I have is that the cake has been baking on 350 for 36 min and it is still not done
    Reply
  10. Joy says

    August 28, 2013 at 6:55 pm

    This is by far the best red velvet cake recipe I've used. The only thing different I've done, was adding mascaporne and a tinge of lemon juice to the cream cheese frosting for a smoother texture. You could also put white chocolate flakes to give an extra edge!
    Reply
  11. PTCL Broadband Speedtest says

    October 3, 2013 at 11:15 am

    Very Good, and it will be delicious :)
    Reply
  12. andreina says

    November 1, 2013 at 2:00 pm

    Hi! I'm trying to bake this cake based on this recipe, and I read temp on 350, is it on Fº or Cº. thanks, and sorry for my ignorance, i'm new in this :)
    Reply
  13. Nicole says

    November 1, 2013 at 2:44 pm

    andreina - The temperature should be 350 degrees F.
    Reply
  14. S says

    November 17, 2013 at 8:36 am

    Have you ever used nuts in the cake batter? My daughter-in-law said she ate a RVC years ago that had nuts in it.
    Reply
  15. may says

    December 7, 2013 at 2:51 pm

    I wanted to leave this comment as I feel I finally should. I found this recipe a few years ago when I was looking for something to really WOW my boyfriend for his pot-luck birthday. I've made this recipe a few times, once i even turned them into what I called, "Blue velvet cookie monster cupcakes" as i had zero red food coloring and the stores were out! my cupcakes turned out AMAZING and were bluer than the sky, people are still talking about it. It is now tradition for me to make this cake on my boyfriends birthday. I really love this cake. I tend to not like cakes as i find them dry but every time i make this cake it is sinfully moist and fantastic. Today I made this cake yet again for a girlfriends birthday. I have realized through trial and error that this is a cake best made in advanced, and baking it for the full time ( here in Canada) is essential. I am not a master froster, lol, so next time i make this (2 months from now!) I will be chilling the cakes over night in the fridge along with the frosting, which likes to become a bit too soft. I also think doing the first layer of icing, chilling, then doing the next one is a great idea. This time it took FOREVER to cover up all the red crumbs which truly have minds of their own and like to wander all over the place. This recipe is truly amazing, in fact, it's given me a 'red-velvet cake snob' effect as I can't enjoy any red velvet but this one, the grocery stores just can't do it the same. I want to thank you so much for sharing your recipe with us all, my cakes will never be the same! (I also have a plan to make it purple sometime, the taste never changes!) Yours Truly, May (RainSmurf)
    Reply
  16. Santo Klich says

    December 30, 2013 at 4:07 am

    My dream retirement would involve a nice log cabin in the mountains. Who needs a beach?
    Reply
  17. radhaks says

    January 9, 2014 at 4:51 pm

    I made this recipe for a friend's birthday cake tonight....in tasting the crumbs, I really like it. I wanted to make a square or rectangular shaped 2 or 3 layer cake with it, so I baked it in a jelly roll pan. fit perfectly and I checked the timing while baking. It seemed (and tested with a toothpick) done at somewhere b/w 20 & 25 min. I let it cool on a rack for 20 min and then when turning it over, the cake fell apart in the middle...it was quite soft and compact in the middle (sides were perfect)!! After cooling in fridge, still the same. Any thoughts as to why this happened? I have a convection oven and baked it at a 300F temp (per conversion chart) on convection fan only setting. Any thoughts would be greatly appreciated...I want to make this again - but with a better texture! Thanks.
    Reply
  18. Sherie says

    January 9, 2014 at 5:44 pm

    You baked it in a jelly roll pan? Well the recipe calls for three 8" or two 9" cake pans, which usually have at least 2" insides. A jelly roll pan has about 3/4 inch sides and is made to create a sponge roll, with beaten egg whites, etc. If you had to have a square cake, you might have tried a 9 x 13 x 2 pan and cut the layers, but really the cake is fabulous if baked in cake pans with the yummy frosting between the layers. The answer to your dilemma is the pan you used was too small, and it didn't bake through in the center (you didn't test with your toothpick in the center, I'll bet), and thus was raw. If you had baked it through in the center, the sides would have been over-baked and dry.
    Reply
  19. radhaks says

    January 9, 2014 at 8:07 pm

    Sherie - thanks for your response & stating the (clearly stated in recipe) point that it was meant to be baked in 8 or 9" cake pans. As I noted above, I did in fact test the cake in the center - it came out clean and the sides were perfect - not overbaked!!. btw - the batter fit perfectly :)!! My goal was to bake this in a jelly roll pan to make a 2 or 3 layer cake (sorry - repeating myself), without having to cut cakes horizontally. I had actually found another rvc recipe (that didnt seem as good but ingr were similar and in similar or same amounts) baked in a jelly roll pan and there they called for 20 min baking time with toothpick testing to make sure. However, I wanted to use this recipe - it seemed better - and I'm glad I did...the cake was AWESOME - just as I said - overly moist in the middle. I thought maybe it had to do with a step in the process vs the pan? My butter at the start wasnt very soft...just sort of soft...and took forever to become fluffy with the sugar. Might that have been the problem? I will try this again and see what happens if I adjust that step. Otherwise, thank you Nicole, for the great recipe - great hit at my friend's b'day party!
    Reply
  20. grace says

    January 29, 2014 at 12:05 am

    I have made this cake over and over in various pan size formats for the past 4 years. It is by far one of the more authentic and genuinely tasty recipes I have made. Since cake flour is not available where I am, it has been All purpose flour all the way for me. In the past 6 months complacency has gotten the best of me and the resultant cake has come out dry like the Sahara. I was at one of the events when it was cut and it actually just crumbled...;( I went back to this post and was very happy to see the lOooooong list of experiences and comments on here. So my lessons from these are pretty much as all of you have stated.....I sift flour.....then measure our 2 1/4 cups.......sift again. The more air the better. After I almost painted myself and my kitchen red the first time I made this cake, I have started adding the coloring directly to the mix and the cocoa along with the flour. I use the Americolor Super red gel paste and 1oz is more than sufficient for a lovely red color. I have a 1 oz measuring spoon to measure the gel paste and then rinse it with the buttermilk so there is no wastage of coloring. The other significant thing is to make sure you do not make very deep layers. This cake is meant to be baked in shallow layers. Deeper layers means more batter, longer cooking time and higher domes also resulting in dry cake. I usually lower the temp to 325*C if I make deep cakes. Sandwich tins (2'' deep) are better than the deep tins because it allows the top to cook faster. Once the cakes come out of the oven. I let is sit about 10 mins in the pan before turning them out on to a wire rack. Another 10 mins to settle on their backs and put them on a board and cover them with cling film till fully cooled and ready to frost. This also helps retain moisture in the cake. You can also freeze the layers at this stage. use sugar syrup when torting the layers before I add the frosting. Here are some recipe amounts for various pan sizes: 1 recipe gives me 5 cups of batter. Remember I use all purpose flour 6'' cakes - 1 recipe gives 4 layers approx. 1.5'' high on sides with a pretty high dome. 7'' cakes - 1 recipe gives 3 layers almost 1.75'' high on sides with a fairly high dome 8'' cakes - 1 recipe gives 2 layers about 1.5 on the sides with a gentle dome. 9'' cakes - 1 recipe gives 2 layers 1.25 on the sides a gentle dome 10'' cakes - 1.25 times recipe gives 2 layers about 1.25- 1.5 on the side with a gentle dome. Any deeper than this and the layers are dry as the size is so large 12'' cakes - 1.5 times recipe gives 2 layers about 1.25 - 1.5 on the side with a gently dome. For deeper layers you will have to use a heat conductor in the center. For all of the above baking times varies from 20 mins to 45mins (10''+) You can safely start checking from 20mins onwards for smaller formats and 30mins onwards for larger ones. This may vary from oven to oven.
    Reply
« Older Comments
Newer Comments »

Leave a Reply Cancel reply

Primary Sidebar

Follow

  • Facebook
  • Instagram
  • Pinterest
  • RSS
  • Twitter

Posts by Category

Copyright © 2021 · Privacy · Terms and Conditions